 Adding an External Report
The list of reports displayed can include reports other than those created in Reporting4Act!. For example, you may have some existing Crystal (RPT file) or Visual FoxPro (FRX file) reports you want to run from within Reporting4Act!. To add these to the list of available reports, choose New in the Reports Explorer toolbar and when asked for the type of report, choose the External Report Wizard. You can also click the down arrow to the right of the New button in the toolbar and choose External Report from the menu that appears. You can also drag an RPT or FRX file from Windows Explorer and drop it on the reports list of the Reports Explorer or select the desired RPT or FRX files from the Import Reports dialog.
If you chose External Report from the menu or report types dialog, select the existing report you want added to the list by either typing the path and name of the report or clicking the small button beside the file name and selecting it in the Open File dialog that appears. If you dragged the file to the Reports Explorer or selected the file from the Import Reports dialog, the file name is already filled in. After you've selected the report file, Reporting4Act! reads the report definition to determine which fields appear in the report. If it can't determine the fields used, you are warned that you cannot filter or sort this report in Reporting4Act!.
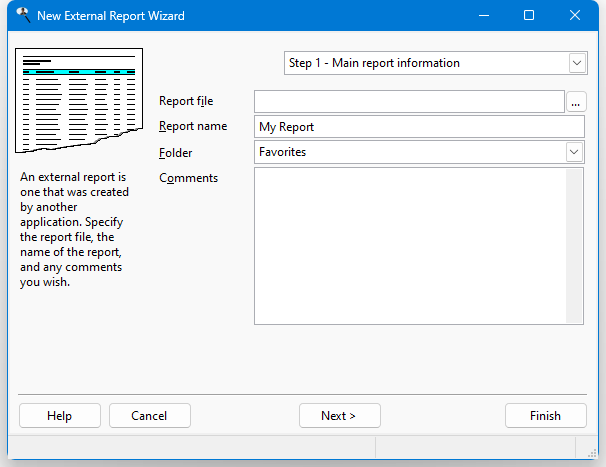
After entering the report file name, enter the same information you would enter when creating a new report in Reporting4Act!:
Report name: the name of the report. If you enter the name of an existing report, an error message displays. You cannot go to the next step until you have entered a valid report name.
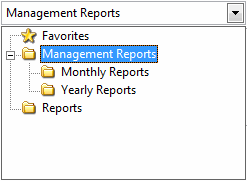
Folder: the folder this report belongs in. The default is the current folder in the Reports Explorer. You can select the desired folder by clicking the down arrow beside the folder name and choosing the folder in the list that appears. To expand a folder, click the + sign in front of the folder name; the + sign changes to a - sign. To collapse a folder, click the - sign in front of the folder name; the - sign changes to a + sign. To select the desired folder, either click it and click the down arrow again to close the list or double-click it.
Comments: any comments entered here appear in the Reports Explorer when the report is selected.
Step 2 allows you to specify certain options for the report. Which options you see depend on the type of report you selected. These are the options for Crystal reports.
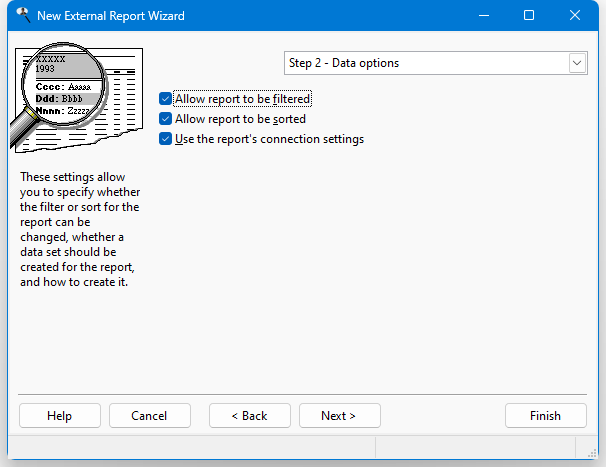
Allow report to be filtered: turn on this option if someone can specify a filter for the report in the Reports Explorer. This is normally checked, but is unchecked and disabled if Reporting4Act! cannot determine which fields appear in the report.
Allow report to be sorted: turn on this option if someone can specify a sort order for the report in the Reports Explorer. This option is unchecked and disabled if Reporting4Act! cannot determine which fields appear in the report.
Use the report's connection settings: although a Crystal report has its own information about how to connect to a database, normally Reporting4Act! changes the connection for the report so it accesses the currently open database. That's handy because it means the report will access the same database Reporting4Act! reports do, not just the one the report was created for. However, if you want the report to use its own connection information instead, turn this setting on. This is important if the report should always connect to a specific database regardless of what's open in Reporting4Act!.
These are the options for Visual FoxPro reports.

Allow report to be filtered: turn on this option if someone can specify a filter for the report in the Reports Explorer. This is normally checked, but is unchecked and disabled if Reporting4Act! cannot determine which fields appear in the report.
Allow report to be sorted: turn on this option if someone can specify a sort order for the report in the Reports Explorer. This option is unchecked and disabled if Reporting4Act! cannot determine which fields appear in the report.
Edit report using Quick Report Wizard: this option specifies whether you can edit the report using the Quick Report Wizard. With this option turned off, the report must be edited in Visual FoxPro (choosing Edit for this report brings up the External Report Wizard). With this option turned on, editing the report brings up the Quick Report Wizard, and you can use the Advanced Report Designer to edit the report. Note that turning this option on causes the report to be read into and stored in the Reporting4Act! reports file, so making changes to the Visual FoxPro FRX file outside Reporting4Act! has no effect on how the report appears within Reporting4Act!.
Create data set for this report: if this option is turned on, Reporting4Act! creates a data set for the report to run against. Turn this option off if the report creates its own data set, such as in the DataEnvironment Init or BeforeOpenTables methods. See later in this section for some issues regarding this option. This option is only available if Reporting4Act! can determine which fields appear in the report.
Use custom SQL statement: this option is only available if Create data set for this report is turned on. Turning this option on means you want a specific SQL statement executed for a report to create the data set, rather than the SQL statement that Reporting4Act! normally uses. After turning this on, enter the SQL statement in the text box below this option.
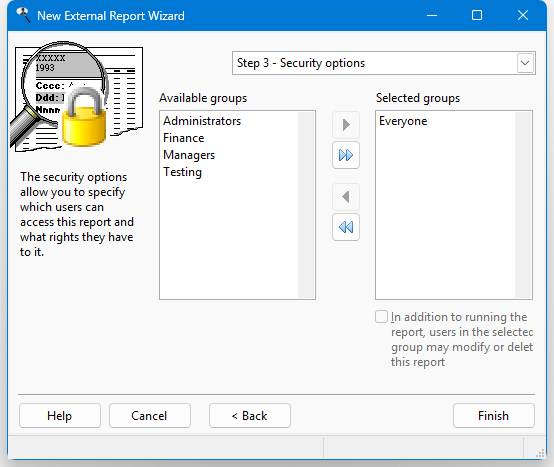
The options in Step 3 allow you to determine who can access your report and what they can do with it.
The options in this step are:
Available groups: this shows which user groups do not have access to this report.
Selected groups: this shows which user groups have access to this report. By default, the Everyone group has access to a new report, so all users can see it. If you want only certain users to see it, remove the Everyone group from the Selected list and add the appropriate groups from the Available list. If no groups have access to the report, the report is essentially private, available only to you.
Add: clicking this button adds the selected group in the Available list to the Selected list. You can select several groups by holding down the Ctrl key as you select them; clicking Add adds all selected groups to the Selected list. You can also add the group by double-clicking it in the Available list, selecting it and pressing Enter, or dragging the group from the Available list to the Selected list. The group is removed from the Available list.
Add all: clicking this button adds all groups from the Available list to the Selected list.
Remove: clicking this button removes the selected group (or groups if you have selected more than one) from the Selected list. You can also remove the group by dragging it from the Selected list to the Available list. The group is added to the Available list.
Remove all: clicking this button removes all groups from the Selected list, and adds them to the Available list.
In addition to running the report, users in the selected group may modify or delete this report: turn this option on if the selected group in the Selected list is able to edit or delete this report; if this item is turned off, only you are able to do so.
When you are finished, click the Finish button to save the report and add it to the reports list in the Reports Explorer. If you do not want to save the report, click the Cancel button instead.
Crystal Report Issues
There are several issues specific for Crystal reports:
In order to run a Crystal report from Reporting4Act!, your computer needs the Crystal runtime files to be installed. This may have already been done if you are using another application that also uses Crystal reports. If not, check with your system administrator to install those files. One issue regarding this is that versions of Crystal Reports after Crystal Reports XI no longer support the Component Object Model (COM) interface. Reporting4Act! communicates with Crystal Reports using COM, so even if you have a newer version, be sure to download and install the Crystal Reports XI (or earlier) runtime files.
Reporting4Act! only supports Crystal reports that connect to the database using ADO or ODBC.
If the report connects to the database using ADO and Reporting4Act! connects to the database using ODBC, the connection will fail if the ADO provider the report uses is anything other than the Microsoft OLE DB Provider for ODBC Drivers. In that case, turn on the Use the report's connection settings setting so the report handles its own connection to the database.
Visual FoxPro Report Issues
There are several issues specific for Visual FoxPro reports:
Fields in the report should either be aliased with the table name (for example, CUSTOMER.COMPANY rather than just COMPANY) or you must put *:SFREPORTS EXPRESSION TABLE.FIELDNAME (where TABLE is the name of the table and FIELDNAME is the name of the field; for example, *:SFREPORTS EXPRESSION CUSTOMER.COMPANY) into the Comment for the field in the report. This allows Reporting4Act! to determine which fields it must retrieve from the database when running the report. If fields aren't aliased or are aliased with a table name that doesn't exist in the data dictionary, you'll get the warning "Reporting4Act! cannot read the fields used in this report. You will not be able to filter or sort this report."
The "private data session" setting for the report is ignored if the Create data set for this report option is turned on. Also, any tables or views that appear in the DataEnvironment of the report are removed before it's run (they're removed in a copy of the report that's made just before the report is run so the original isn't altered). Also, any code that creates a cursor in the Init or BeforeOpenTables methods of the DataEnvironment is executed, but the cursor that's used for the report is the one Reporting4Act! creates, not the one created by such code.
If the Create data set for this report option is turned off, you won't be able to filter and sort the report in Reporting4Act!, because the report handles its own data retrieval.
© Keystroke.ca, 2025 • Updated: 06/07/16
Comment or report problem with topic