 Scheduling Reports
Reporting4Act! has a scheduler that allows you to run certain reports at certain times. For example, you may have a report named Daily Activities that you want emailed to someone every morning at 7:00 am. The Reporting4Act! scheduler uses the scheduler built into Windows to perform the actual report run but makes it easier to schedule a report than the Windows Scheduler program.
The scheduler is not available if you are running Reporting4Act! on Citrix, you are not an advanced user, or you do not have an Ultimate license.
You get a warning if you try to schedule a report that has ask-at-runtime filter conditions, since that prevents a scheduled report from running.
Here's how to schedule a report:
Select the desired report.
Choose Schedule Report from the Tools menu or the Tools tab of the ribbon, or right-click the report and choose Schedule Report from the shortcut menu.
In Step 1, specify the name to assign to the task (this name is used as the name for the Windows Scheduler task), the Windows Task Scheduler folder the task should go in (either the "root" folder or one specific for Reporting4Act!), how often the report is run (daily, weekly, or monthly), the time the report is run, whether the task should be synced across time zones, how often to repeat the task, and whether the report runs even if there are no records that match the filter conditions so you don't have to wonder why the schedule appears not to run when there's no output. The Use saved email settings option allows you to specify whether or not to use saved email settings. Having this turned on is helpful because the Windows account you run the task under may not have email settings set up. However, if the email settings change, such as a new password, the saved settings will be out of date and the email may not be sent. Turn on Ignore for any filter conditions you want to ignore when the scheduled task runs (the grid of conditions only appears if there are any filter conditions for the report).
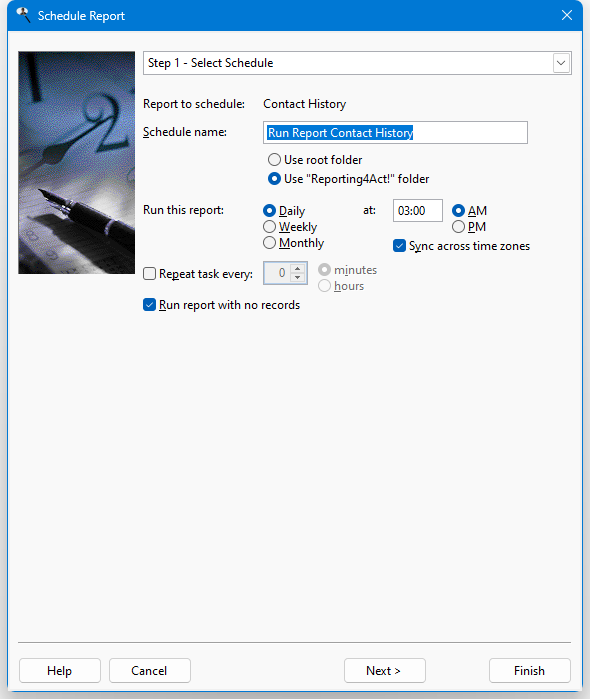
If you choose Daily, the time you specify is affected by Daylight Savings Time (DST). For example, if you schedule a task for 3:00 a.m. when DST is not in effect, the task will actually run at 4:00 a.m. once DST is in effect. To prevent that, choose Weekly instead of Daily and in step 2, make sure every day is chosen.
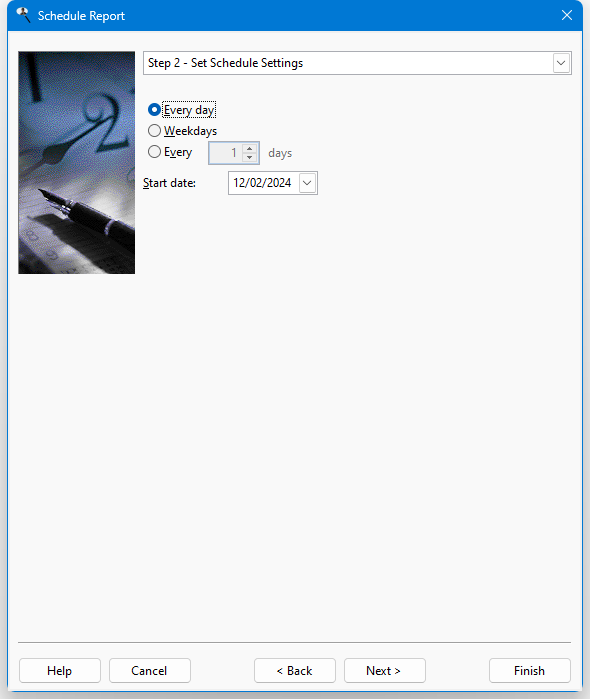
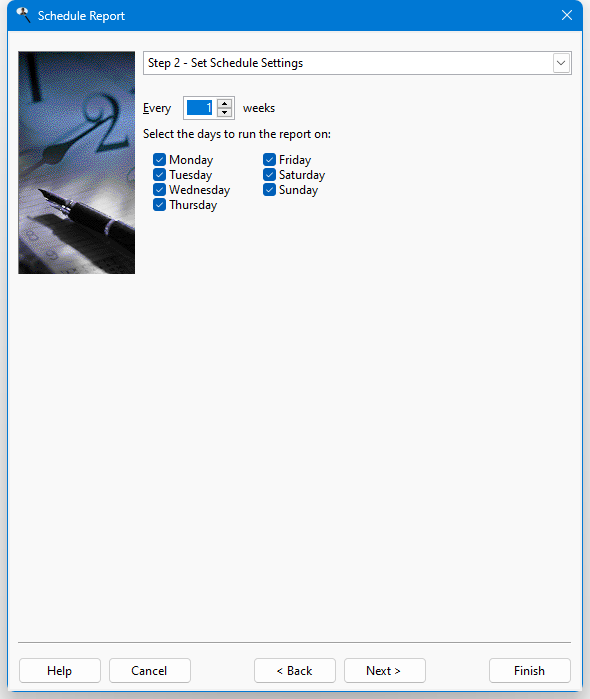
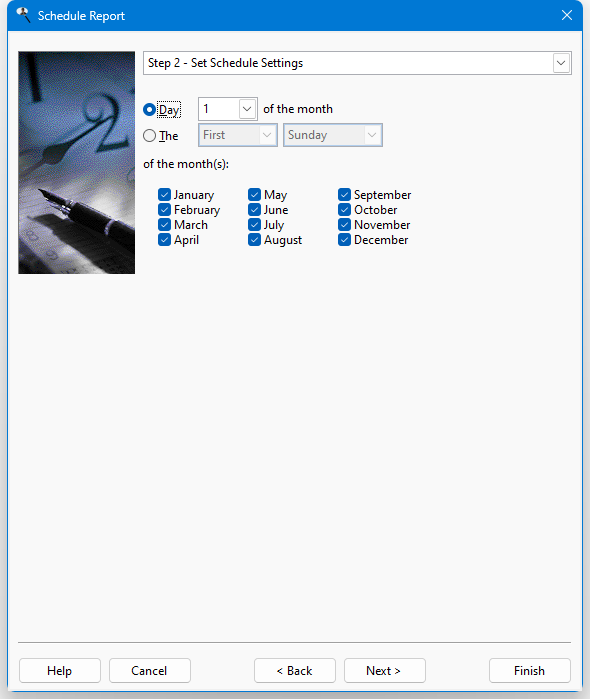
Click the Next button. Which options appear in the next step depends on whether you choose a daily, weekly, or monthly schedule.
For a daily schedule, specify whether the report runs every day, on weekdays only (Monday through Friday, inclusive), or every few days (specify how many days apart the report runs, such as every 3 days). Enter the date for the first run of the report.
For a weekly schedule, specify how many weeks apart the report runs (such as every 3 weeks) and on which days to run the report.
For a monthly schedule, specify whether the report runs on the same date of every month (for example, the 15th), the last day of the month, or the same day (such as the second Monday). Specify which months the report runs in (the default is every month).
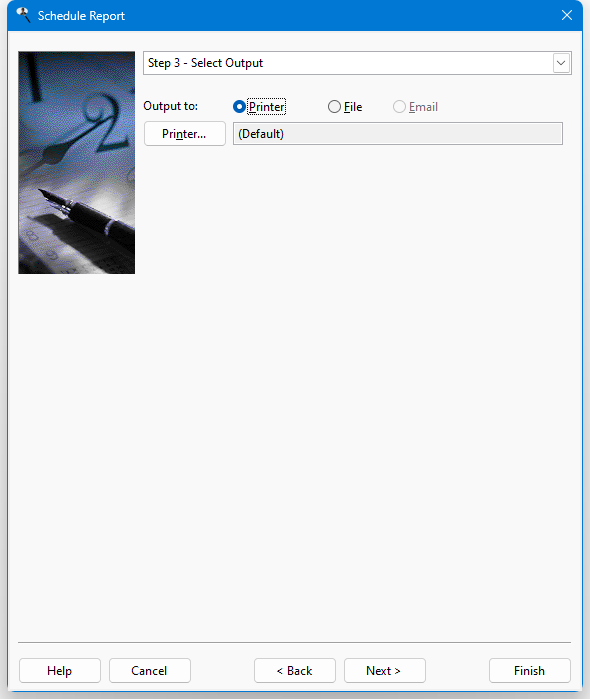
Click the Next button and specify where the output is sent. The default is to print the report, but you can also choose to output the report to a file or email. The options in this step are the same as they are in the Output page of the Reports Explorer.
You cannot schedule a report to output to some Microsoft Excel or Microsoft Word formats because they require running Excel or Word behind the scenes and they cannot be reliably run from a scheduled task as Microsoft themselves admit.
You'll get a warning if you schedule a report to output to or email a file on a mapped drive, since drive mappings don't work well in scheduled tasks.
A scheduled report has to run under a specific Windows account, so click the Next button and enter the login name and password of the account to run the report under. Normally, this is your usual Windows user name and password. Click the "show password" button toggle between displaying the password in plain text or as "*****" (the password is always stored encrypted regardless of the setting of this button). If you are on a network, you may need to specify the domain using "DOMAIN\USERNAME." Note that the scheduled task cannot be saved if you don't have a password for your Windows account; see http://support.microsoft.com/kb/310715 for details. The Schedule Wizard remembers the user name and password you entered last time you scheduled a report so you don't have to enter them every time you create a schedule.
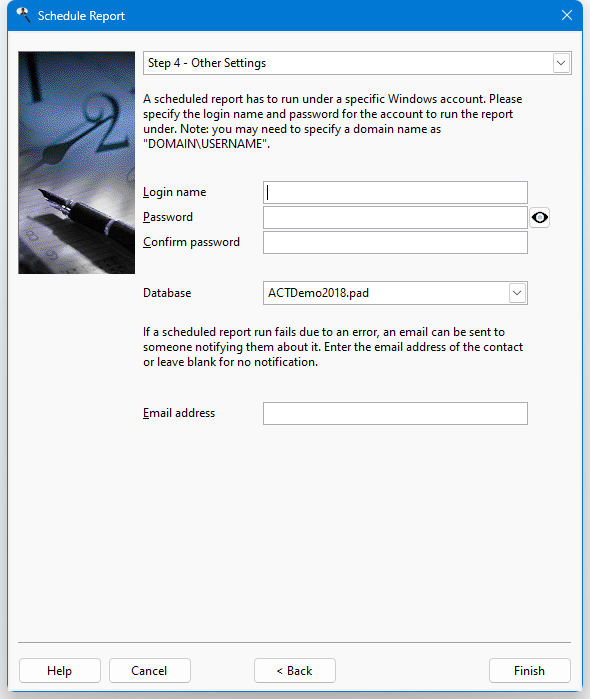
Database: allows you to select the database to run the schedule for. This function is only available if you have more than one database available.
Email address: if a scheduled report run fails due to an error, an email can be sent to someone notifying them about it. Enter the email address of the contact or leave blank for no notification.
When you are finished specifying the settings for the schedule, click the Finish button. The report runs automatically on a regular basis according to the schedule settings.
To edit a schedule for a report, follow the same steps as above. Change any settings you wish and choose Finish (notice that you must enter the account information each time).
If you want to create a new schedule for the report, specify a different schedule name. The existing schedule for the report is left alone and a second schedule is created for the report when you choose Finish.
Note that the Schedule Wizard adds the name of the database to the schedule so the report is run against the database open when the schedule was created rather than the last database accessed.
You can manage your scheduled reports using the Scheduled Tasks function in the Tools menu.
Report schedule settings are stored in an XML file using the same format as described in the Running from Other Applications topic in the Schedules subdirectory of the folder where your reports are stored. The name of the file is Schedule Name Parameters.XML, where Schedule Name is the name of the scheduled task.
The Windows account a scheduled report runs under does not have to have run Reporting4Act! to specify email settings. Instead, the email settings for the user who scheduled the report are used.
© Keystroke.ca, 2025 • Updated: 11/06/25
Comment or report problem with topic