 The Reports Explorer
The Reports Explorer appears as follows:
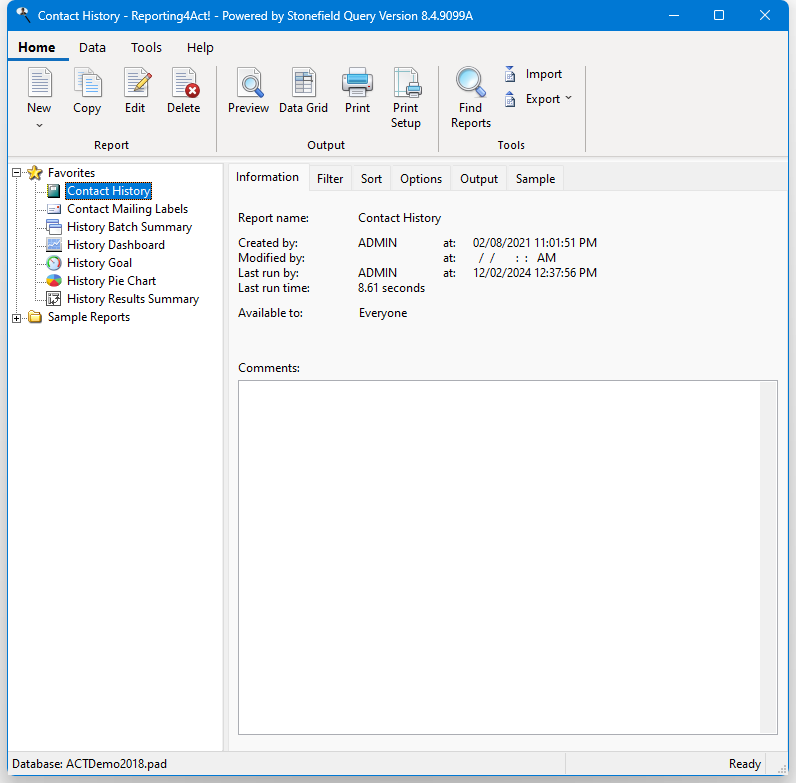
At the top of the window is either a menu and toolbar or a ribbon similar to that in Microsoft Office applications, depending on the Display ribbon instead of toolbar and menu setting in the Options dialog.
There are four main areas in the Reports Explorer:
The toolbar or ribbon across the top has various functions you can access by clicking a button.
The reports list at the left shows which reports you can access. These reports are organized into folders, much as you'd organize real paper reports into folders. Although you can create as many folders as you wish, one folder is automatically created for you: Favorites, intended to hold reports you use frequently. This folder appears first in the reports list. Reports can actually exist in more than one folder (much as you can have shortcuts to files on your Windows desktop), so you can have a report in both a Management Reports folder and your Favorites folder. If there are other Reporting4Act! users on your network, you see their Favorites folder appear as "Username's Favorites" (for example, "Bob's Favorites").
The area at the right has different pages of information and settings for the selected report or folder. To choose a particular page, click the tab you're interested in. Depending on the report you select, not all of these pages may be available.
The Information page shows information about the selected report, such as its name, who created it and when, who last modified it and when, who last ran it and when, how long the last run took, and comments. For folders, it shows the folder name, who created it and when, how many reports and folders there are in the folder, and comments. It also shows what groups have access to the report or folder.
The Filter page allows you to select which records to print.
You can determine how the report is sorted on the Sort page
The Options page allows you to control things such as the header and footer for each page, the orientation, and the left margin.
The Output page is used to specify where to send the report when you run it, such as to a particular file or email address.
The Sample page shows a snapshot of what the report looked like the last time it was run. This page is disabled if there isn't a snapshot for the report, such as if it hasn't been run since the last time it was edited or the Create and display report snapshots setting is turned off in the Options dialog.
The status bar at the bottom of the Reports Explorer shows the currently selected database at the left and the current status (such as whether a report is running or not) at the right.
The version number displays in the title bar so you can quickly see which version you are running.
You can select functions to perform by clicking the appropriate button in the toolbar or ribbon, choosing a function from the menu (if it appears), or right-clicking anywhere in the Reports Explorer and choosing the desired function from the shortcut menu that appears.
You can resize the Reports Explorer window by clicking the lower right corner of the window and dragging until the window is the desired size. You can also adjust the relative size of the reports list and pages area by clicking the space between them and dragging left or right. Reporting4Act! remembers the size and position of the Reports Explorer, the sizes of the reports list and pages area, which folders were expanded and which were collapsed, and which report or folder was selected, and restores all of these things the next time you run it, so it comes up the same way it did when you closed it.
© Keystroke.ca, 2025 • Updated: 12/08/21
Comment or report problem with topic